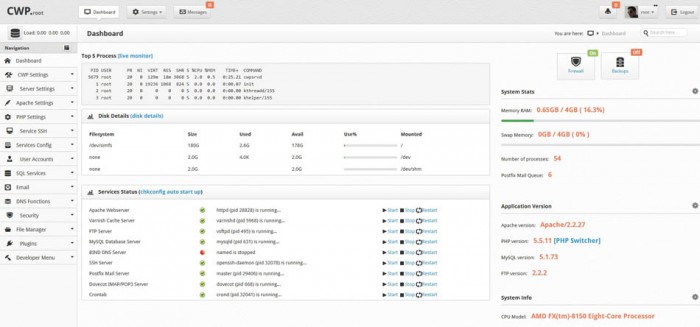
Merhaba bu yazımda sizlere bir başka web server kontrol panelinden söz etmek istiyorum. Bu panelimiz, biz linux severlerin göz bebeği olan CentOs tarafından geliştirilmekte. Panelimizin adı CentOs Web Panel. CentOs web panel, kolay ve hızlı kullanımıyla dikkat çekiyor. Bütün kontrol işlemlerini ssh bağlantısına gerek kalmadan panel üzerinden yapmanıza olanak sağlıyor. Dedicated, VPS, VDS serverleriniz için ücretsiz olarak kullanabileceğiniz bu panel sizi bir çok zahmetli işten kurtaracak nitelikte.
CentOS web panel, kurulumu ile birçok ücretsiz serviside beraberinde getirerek, kullanıma sunmakta. Dilerseniz panelle birlikte gelen servislerimizi sıralayalım.
- Varnish Cache server (improve your server performances by 3x)

- Compiles Apache from source (improves up to 15% on performances)

- Compiles PHP from source (improves up to 20% on performances)

- suPHP & suExec (improved security)

- PHP switcher (switch between PHP versions like: 5.2, 5.3, 5.4, 5.5)

- FreeDNS (Free DNS Server, no need for additional IPs)

- Setups Server for Web Hosting (websites like WordPress...)

- Hardware Information (CPU core and clock info...)

- Software Info (kernel version, uptime...)

- Services Status (Quick services restart eg. Apache, FTP,Mail...)

- ChkConfig Manager (Quick list and manage your services)

- Live Monitoring (Monitor services eg. top, apache stats, mysql...)

- Use Java SSH Console within panel

- Services Configuration (eg. Apache, PHP, MySQL...)

- Run shell commands in screen/background

- MySQL Database Managment

- Email Accounts Managment

- CSF Firewall (Best Linux Firewall)

- File Manager

- TeamSpeak 3 Manager

and many other options...
Ayrıca panel üzerinde TeamSpeak 3 ve Shoutcast radyo serveri ayarlamalarını kolaylıkla yapabilirsiniz. Servisleri biraz daha detaylandıracak olursak;
- Setups Server for Web Hosting (websites like WordPress…)
Web Server
- Varnish Cache server (improve your server performances by 3x)
- Compiles Apache from source (improves up to 15% on performances)
- Apache server status, configuration
- Edit apache vhosts, vhosts templates, include configuration
- Rebuild all apache Virtual hosts with one click
- suPHP & suExec (improved security)
- Mod Security + OWASP rules (one click install, easy management)
PHP
- Compiles PHP from source (improves up to 20% on performances)
- PHP switcher (switch between PHP versions like: 5.2, 5.3, 5.4, 5.5)
- Simple php editor
- PHP addons with one click
- PHP.ini editor & PHP info & List modules
User Management
- Add, List, Edit adn Remove Users
- User Monitoring (list users open files, listening sockets…)
- Shell access management
DNS
- FreeDNS (Free DNS Server, no need for additional IPs)
- Add, Edit, List and Remove DNS zones
- Edit nameserver IPs
- DNS zone template editor
- postfix & dovecot
- MailBoxes, Alias
- Roundcube webmail
- Postfix Mail queue
System
- Hardware Information (CPU core and clock info)
- Memory Information (Memory usage info)
- Disk Info (Detailed Disk status)
- Software Info (kernel version, uptime…)
- Services Status (Quick services restart eg. Apache, FTP,Mail…)
- ChkConfig Manager (Quick list and manage your services)
- Network port usage
- Network configuration
- SSHD configuration
Monitoring
- Live Monitoring (Monitor services eg. top, apache stats, mysql…)
- Use Java SSH Console within panel
- Services Configuration (eg. Apache, PHP, MySQL…)
- Run shell commands in screen/background
Security
- CSF Firewall (Best Linux Firewall)
- SSL generator
SQL
- MySQL Database Managment
- Add local or remote access user
- Live Monitor MySQL process list
- Create, Remove database
- Add additional users per database
- MySQL server configuration
- PhpMyAdmin (database managment)
Additional options
- TeamSpeak 3 Manager (Voice servers)
- Shoutcast Manager (Shoutcast streaming servers)
- Auto-update
- Backup manager
- File Manager
and many many other options…
to do List
We plan to improve & add following soon
- quotas
- users panel (with v1.0)
- additional 3rd party applications
- improved security and limits per user
- ffmpeg and others…
- Server monitoring scripts (Load, Memory, Mail Queue, Security)
- Live notifications (get notification in CWP about issues on the server)
- SPAM Mail Server Filtering
…and many others
Panel ve birlikte gelen servisler hakkında bilgileri sunduk artık kuruluma ve panelden görüntülere geçebiliriz.
Panel Demosu İçin : http://centos-webpanel.com/demo adresini ziyaret edebilirsiniz.
Kurulum ve talimatlar için : http://centos-webpanel.com/installation adresini ziyaret edebilirsiniz.
KURULUM
Kuruluma geçmeden belirtmek isterim ki eğer kaynağı sınırlı bir sunucunuz varsa işletim sistemini 32 bit seçin, kaynak sıkıntınız yoksa 64 bit çok daha iyi performans verecektir. CentOs bu paneli 6.x sürümü ile kullanmanızı önermekte.
İlk olarak sunucumuza putty ile ssh bağlantısı sağlıyor ve root olarak oturum açıyoruz.
Serveri her zaman update etmekte fayda var, bu yüzden bağlandıktan sonra ilk olarak serverimizi aşağıdaki kod yardımıyla update edelim.
yum -y update


İşlemler tamamlandıktan sonra serverimizi aşağıdaki komut yardımıyla yeniden başlatalım.
reboot

Serverimiz yeniden başladıktan sonra tekrar putty ile ssh bağlantısı sağlayıp root olarak oturum açalım.
Bağlandıktan sonra sırasıyla aşağıdaki komutları uygulayarak kurulumu başlatalım.
cd /usr/local/src

wget http://dl1.centos-webpanel.com/files/cwp-latest.sh

chmod u+x cwp-latest.sh

sh cwp-latest.sh
Eğer wget komutu çalışmazsa aşağıdaki komutla wgeti serverimize kuralım ve daha sonra yukarıdaki adımları tekrarlayarak kurulumun tamamlanmasını bekleyelim.
yum -y install wget


Kurulum tamamlandı. Bu aşamada ki bilgileri kopyalamanızı tavsiye ederim. Giriş için http://SERVERIPADRESİ:2030 adres çubuğuna yazarak çağırıyoruz.
Kullanıcı Adı: root
Şifre: ssh root şifreniz.


Panelin arayüzü oldukça hoş ve kullanışlı. Şimdi test için bir alan adı ekleyelim ve wordpress kuralım fakat öncesinde yapmamız gereken önemli bir kaç ayar var.
1 NameServers kurulumu> CWP *- > DNS Functions -*> Edit Nameservers IPs

2 Paylaşılan IP kurulumu> CWP –> WebPanel Settings – -> WebPanel Settings

Artık alan adımızı ekleyebiliriz.


Hostumuzu kontrol edelim.

Sorunsuz çalışmakta. Şimdi bir veritabanı oluşturalım ve wordpress kuralım.

artık wordpress kurulumuna geçebiliriz.


Son resimden de anlaşıldığı üzre sitemiz ve permalinks sorunsuz çalışmakta, ayrıca eğer yoğun bir siteniz varsa ve (hosting,reseller) de sıkıntı yaşıyorsanız digitalocean dan aylık 5$ a bir vps server edinip bu şekilde kurulum yaparak sorunsuz kullanabilirsiniz. Kaynak tüketimi hiçte fena değil.

Umarım faydalı bir yazı olmuştur. o12.org Teknograph
Konu Linki:http://www.o12.org/2014/07/07/centos-web-panel-tanitim-ve-kurulum.html


